Friday, April 27, 2012

DIY 3-of-26: Fabulous, Funky File-Folders

This week I set out on a big organizing project and in the process I needed some file-folders. I wanted some decorative ones as they would be seen in the main part of the house and was appalled to find them for $6 for 5 folders at my local organization store!!! I picked up a pack of manila ones on my way home for $4.40 for 50 folders and some paper and here is what I created!
Want a pretty way to organize all of those loose papers laying around?...Here is how ya do it!
Supplies:
  • Plain File Folders
  • 12x12 Paper (2 sheet per folder)
  • Scissors
  • Pencil
  • Paper Cutter
  • Spray Adhesive
  • Clear Coat Spray Paint
#1: Cut half of your sheets of paper into two pieces; one 7 inches long for the front of your folders and remaining 5 inches will become the spines of your folders. Cut the other half of your sheets of paper into two pieces as well; one 7¾ inches for the back of your folders and the remaining 4¼ inches will become your inner tab. Mix up all of your paper to make creative combinations that are unique but all coordinate!

#2: Fold the 5 inch pieces the long way (the hot dog way!) and set aside.

#3: Lay your front and back pieces printed side down and your file folder on top. Trace the outline of the folder tabs with a pencil and cut around the line, you may have to trim a little off the sides.

#4: Using the 4¼ inch pieces of paper do the same tracing and cutting. From personal experience...make sure you lay the paper the way it should look when it is done, then flip BOTH the paper and the folder over and trace on the back so that you do not end up cutting the tab backward!!!

#5: Starting with the inner tab, use a piece of white paper to cover the area you do not want glued and spray the adhesive onto the folder. Line up your paper, lay it down and smooth from the center outward to prevent air bubbles getting trapped. Repeat on the outer side and then allow to dry for 10-30 minutes.

#6: Spray in the inside of your folded piece of paper and then lay the folder in the crease and press smooth. Let dry

#7: Lightly spray all sides with a clear coat of spray paint.  Make sure you do not let the paint puddle or the paper will curl.  Start spraying off the page and then move quickly and smoothly over the folder, making sure you stream of paint is off of the folder when you change directions.

There you have it...quick, fun, and unique! I made six of them as a trial but I am excited to get started on some more! Here are all the combos I did on this round.
Fronts


Backs


I hope you enjoy this project, thanks for letting me share! Happy weekend all!

Thursday, April 12, 2012

An Ancient Adventure

One of my favorite things about New York is that there is always things to do, see, watch, eat, smell, or be! We are trying to experience as much as we possible can. Here are a few pictures from our trip to the Metropolitan Museum of Art...
The ancient Egyptian artifacts were simply fascinating. To see articles that were used by people so many years ago is in many ways a very humbling experience. It makes you stop and realize how short life on Earth really is and inspired me to make the most of it!
These pieces of cloth were over 3000 years old...SO COOL! I am sure glad JJ Tulum has more vibrant colors and patterns to choose from today, can you image how boring the bags would have been if this was the fabric selection?
While we took the entire experience very seriously, Devin and I could not help...well being Devin and I!!! Haha. I think we blended in well with the displays!

We had such a limited time at this incredible institution and we look forward to spending some more time exploring in the future. Thanks for looking at some of our highlights!


Tuesday, April 3, 2012

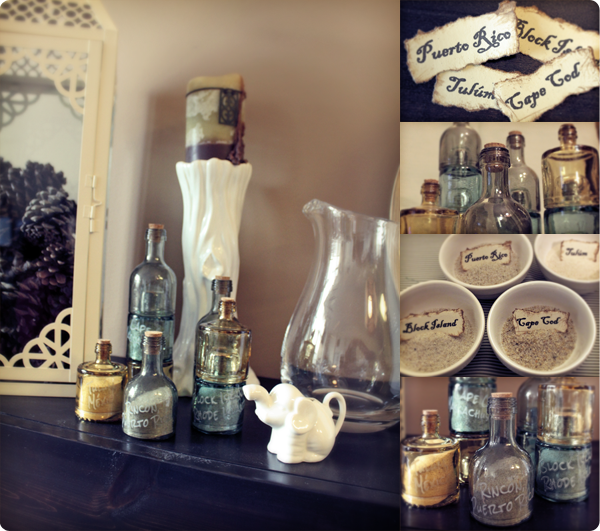
DIY 2-of-26: Decorative Sand Display

Devin and I have always shared the love of travel and although with medical school traveling has become more of a future passion then a current one, we were still able to steal away for a few adventures in the past few years. We wanted a unique and decorative way to display the sand we had collected on our gallivanting and this is what we came up with...
Maybe you have dirt or sand from past trips collecting dust in zip-lock baggies or containers? Well here is how we turned ours into a banister feature! Here is what to do...
Supplies:
Disclaimer: This I was delighted to find the mini Spanish glass bottles that stacked! My initial plan was to Armour Etch Glass Etching Cream (available at any craft store) to etch the names onto the bottles. I practiced on a wine bottle and salsa jar and it turned out beautiful!!! When I went to try it on the Spanish glass it did absolutely nothing! I even left it on for over an hour just to see what would happen and not even a dull spot was noted. Sigh...so I ended up going with Krylon Frosted Glass (also available at any craft store, use a coupon and it is not too spendy) spray paint. I would highly recomend using Armour Etch if you are not working with Spanish glass. Just follow the directions on the bottle and it will turn out gorgeous for my purposes I was happy with the paint.

#1: I wanted a custom font so I bought a blank piece of vinyl and used my craft cutter to cut out a stencil, but can buy the stencils already cut out and they have lots of different fonts to choose from at the craft store. If you you make your own cut out around each name with at least a half inch boarder around the edge. If you are using a pre-cut stencil cut the letter you need apart.

#2: Place the stencil or stencil pieces onto the glass how you like. Putting them at random angles will look more artistic and save you from trying to align them perfectly! If you are using the Armour Etch cream at this point just follow the directions on the bottle. If you are using the spray paint, then keep reading!

#3: Cut a piece of the plastic bag and tape the edges with tape to the stencil, being sure not to cover any of the openings. Spray the paint evenly with sweeping motions. Allow to dry for 6 minutes (not the 8-10mins the bottle tells you to) and then peel everything off. Allow to dry a few hours before touching. I found that "less-is-more" so just about two light passes will be plenty, it will not look like there is anything on it, but when it dries it will look much more like etching rather than blotchy white spray paint.

 
***NOTE*** If you really do not like how the paint went on, then be sure keep the stencil on a the original plastic and then wipe the glass with 100% acetone, wash, allow to dry, reapply the stencil and try again...do not ask me how I know this works! ;0)

Well there you have it...I hope I have worked some of bugs out of this process and will make your decorative journey a bit smoother...who would have guessed that not all glass can be glass-etched! Heehee. Happy Tuesday to you all!

Thursday, March 22, 2012

Business Card Delight

Today my business cards were delivered and I could not be happier with the end result! I am such a tactile shopper...I like to touch and feel things before purchasing, Devin, on the other hand is a die-hard online shopper and at times our worlds collide. He is a wonderful review finder, and always orders products that are superb, but each time it come with a tid-bit of anxiety on my part!We decided on a company, All Business Cards, and were thrilled! They are sharp, not pixelated, and very professional! They came within a few days too which was an added bonus. Here they are...
 
They are the heavy weight, UV coated, high-gloss option
We will be including them in each order from now on and if you want any to pass around please let us know...we have 1000 of them and they are just itching to get out of the box! Have a happy Thursday night all!

Friday, March 16, 2012

Falling Slowly....

I cannot believe it has already been a week since Devin and I stole away to the city for the weekend to celebrate his birthday (very early) and just get away from everything for a bit! It was such a wonderful time to be together, enjoy some wonderful food, culture, "fresh" city air, and rest. 
Our hotel was funky and sophisticated. It was so nice to have fresh towels and sheets that I did not have to wash/fold, not have to make out own bed, and not be constantly critiquing our own space. We even jumped on the bed...don't tell my mama!!! After dropping off our belongings and we headed out for dinner and a Broadway play. "ONCE" is officially our new favorite!!! To sum it up in one word it was magical! The stage never changed and all the music was created by the actors who remained on stage the entire performance! Their talent and musical ability was inspiring and the emotion that the story and music evoked was quite moving. In this day-and-age we need a few more love stories like this one – pure, honest, selfless, and full of passion! A cup of cocoa from Starbucks to warm us up was the perfect end a marvelous day.

Saturday was a leisurely day of breakfast, shopping, city walking, and then dinner at our beloved John's Pizza in Greenwich Village (The BEST "coal fired brick oven pizzeria" in NYC and subsequently the world. Totally worth the 45 minute wait in the cold!!!)! Sigh...a perfect weekend with my sweetheart!

Here are a few pictures from our weekend getaway...twenty minutes from home.
Creepy little animal/people stitched into the pillows!


All dressed up with somewhere to go.

I still get goose-bumps just remembering the music!
A classic New York scene.
Yummmmmmmmmm
Blueberry and banana pancakes in the sun-room of a cafe!

Thanks for reliving last weekend with me! Happy weekend to you all...

Thursday, March 15, 2012

DIY 1-of-26: The Picture Frame Candle Holder

Wandering through the clearance aisles at the store the other day I found an adorably hideous picture frame. It was $3, with chipping gold paint, a broken clasp on the back, and no way to hang or stand on its own. I fell in love! I bought it and set it on my coffee table for a few days in hopes of being inspired to make it something beautiful…this is what I dreamed up!

And here is how you can make your own:
Supplies:
  • Any round picture frame
  • Candle
  • Decorative paper of fabric
  • Felt (Use a color that will match your spray paint)
  • Pen 
  • Screwdriver
  • Spray adhesive (I like KRYLON Easy-Tack)
  • Spray Paint
  • Super Glue
  • Gorilla Glue

 #1: Remove the backing, glass, and any cardboard from the frame. Use the screw driver to remove any and all hardware from the back, leaving with you a completely smooth back.

#2: Place the frame on the felt and trace around the outside of the frame with pen, cut well inside the circle line, making sure that if your frame has holes your felt is cut smaller and will not be seen from the top.

#3: Spray paint the frame, using whatever color you chose. You may need to use a primer to ensure that your paint will stick, but I did not and it turned out fine. It may take multiple coats to get the color even and all of the crevices painted and smooth. My paint was very old and came out splotchy and uneven at first, but I decided I liked the character and uneven pattern so I used multiple coats to make it evenly uneven! Ha. Allow to dry for 24 hours after the last coat.
#4: Use the paper insert or glass from the frame and trace a circle on your fabric or paper and cut it out exactly on the line. Clean the glass well and allow it to dry. Then spray the inside of the glass with the spray adhesive and stick it onto the decorative side of your paper/fabric. REMEMBER: Glue side to decorative (or "correct" side) of paper/fabric. Stick it under something heavy until dry.
#5: Using a thin strip of Gorilla Glue, line the underside of the frame and set the glass in. Add another strip of glue and lay the back of the frame in. Lastly, using the Super Glue, place a thin strip around the frame and lay your felt on the back. TIP: Be careful with the amount of Gorilla Glue you use as it expands when it dries. If you use too much it will ooze out onto the glass on the front of the frame...do not ask me how I know this! ;0)
#6: Place the entire thing on a hard surface (I made a "frame sandwich" with paper towel to protect my counters) and place something heavy on top to give firm, even pressure. This is where Devin's first-year medical books came in very handy! Let dry overnight, and voilĂ , a masterpiece!!!

Here is my coffee table's new BLING!!! Enjoy making your own candle holders, I would love to hear how they went and see pictures of your beauties too! Have a great day.